Showing posts with label Sharpening. Show all posts

Thursday, March 19, 2020

Marttiini – Not a Drink


As found Marttiini Explorer, fixed blade
Marttiini Explorer: It said so on the blade

There is a universe of quality knives that are largely unknown to the American buying public.  One such is the Marttiini brand.  So when I saw the brown leather sheath stamped ‘Marttiini’ among the rest, I knew what to grab.  Their motto is “Created by Artic Evolution” and in that harsh unforgiving environment your knife may be the difference between surviving or dying.  Pick your tools wisely young Jedi.  Marttiini knives are still manufactured at the Arctic Circle.

As found, Marttiini, Explorer
The sheath, especial the closing flap is a little chewed up


The Marttiini Story

Janne Marttiini was born on May 2nd, 1893 in the small village of Kierinki.  It is a harsh environment of short summers and long, cold winters on mountain ranges older than life. In 1928 Janne founded J. Marttiini’s Knife Factory Ltd. on Vartiokatu Street in Rovaniemi.  With the knife user in mind, he began to create beautiful, high quality knives to exceed the harshest conditions imaginable.

He sold his knives throughout the region and their sales created prosperity and opportunity.  As demand for his knives grew Janne hired more and more people and the number of employees grew steadily.  There was worldwide demand for high quality knives, and Marttiini exports grew driven by their quality.

Janne’s son, Toivo Marttiini, led the company in the 60s. Toivo’s younger brother, Lauri Marttiini, took the reins of leadership in 1975.  In 2001 Mrs. Päivi Ohvo, was appointed to the office of CEO.  In 2005, Marttiini’s family sold the entire capital stock of Marttiini Ltd. to Rapala VMC Corporation.  And throughout that time quality knives rolled off the production lines and most of us are unaware of it.

My Marttiini

So what knife did I have?  The blade is vibro etched by hand with INOX - Explorer Knife - Made by Marttiini – Finland.  I could find images, but not much more.  Fortunately the internet came to my rescue.

Hanna Helin at Marttiini answered my e-mail and provided the information I was searching for.  Thanks Hanna!

The Explorer was a line of knives with different blade lengths, 7, 9.5 and 11.5 centimeters.  That would be about 2.75, 3.7 and 4.3 inches long.  The handle is rosewood.  The blade is simply identified as a stainless chrome steel.  The knives were manufactured from the 1980s to their demise in 1996.  Mine is the smallest blade, 2.75 inches with a rosewood handle.

All stainless steel contains chromium.  Chromium forms a semi-flexible, transparent oxide film that prevents rusting.  Excess chromium reacts with the carbon in steel to form very hard and very tiny chromium carbides.  These carbides, despite their name are closer to ceramics in structure and give steel many of its go-to properties.

The knife and its sheath have seen some rough handling.  I didn’t want to give the knife a complete make-over.  While it is a popular descriptive phrase and it makes me laugh, both the knife and sheath have a patina of use I wanted.

The leather sheath needed a cleaning so a mild hand soap and terry cloth rag cleaned the leather and I let it air dry.  I followed it by a polishing with a brown wax polish and buffed the leather.  It still has the stains and burn marks but it looks better. 

Marttiini Explorer, Explorer with rosewood handle, leather sheath.
I like the pressed designs in the leather.  The sheath has a pressed composited slipped down in the blade area to keep the edge from cutting through and biting you.

I had previously purchased a sharpening gauge to determine the sharpening angle of blades and put it to work.  

And it opens beer bottles too!!
The best match, I found, was at 20 degrees.  I found an open spot on the garage work bench and set up my Ken Onion Work Sharp Sharpener.  So what grit belt should I use?

After an initial run on a worn out medium grit belt I selected three grades, coarse, medium and fine.  Then I got out my secret sharpening weapon: a black magic marker.
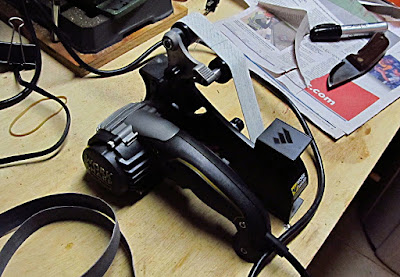
belts of grit. Work Sharp
You can see the Explorer on newspaper next to my secret weapon, the black magic marker 

If you don’t use one I recommend it.  Just color the edge you’re sharpening and each pass will tell you if you are accomplishing what you want.  Clean the residue off the blade with a little shop acetone or nail polish remover.

It took about six passes with the coarse before I had a wire edge on one side of the knife and six on the other to remove it and create a new one.  By following with the medium and fine I walked the edge over to the sharpness I wanted.  I stropped with several sheets of newspaper on a flat surface and it was sharp!


Yes, the polished sheath does still show the patina of wear and use.  I don't know, I find it strangely honest and what I want in any knife is honesty.
I thought about using some 1000 grit wet-dry paper to knock down the rosewood handle finish and reseal with linseed oil, but I elected to stay, at least for the time being, with the original finish on the grip.


Condor knife, Marttiini Condor
The Marttiini Bowie Condor nested deep in its sheath

Unfortunately this knife isn’t available, but others are.  I like their Bowie Condor, another totally icey Marttiini knife.  The black leather sheath has a plastic liner to reduce stab through and protect you if you fall in the field.  The knife sits deep in the sheath preventing accidental pull-out by clothing or grabby summer weeds.  The belt loop sports what I think is a button slit, but I have never been able to confirm it.  I suspect a button sewn just behind your hip, so the belt passes over it would secure your knife in the same place.  The button holds the knife in the same place and the belt secures it to you.  Then when you are searching for the knife under your arctic parka or under multiple layers of wool, fleece and water-proofed canvas you know exactly where the knife is.
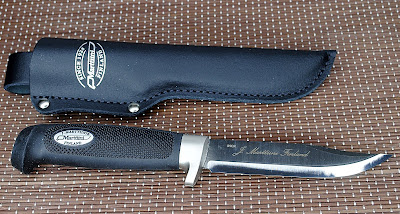

Marttiini condor basic
I've gotten some very nice reports from users in the field for ease of handling and sharpness combined with edge retention.

In any case I really like my Marttiini and recommend it. 

Saturday, June 8, 2019

Blade Show Day Two 2019

Outside the weather raged torrents of rain, but inside the Blade Show it was sunny and knifey.  It’s still hard to imagine all the vendors and shoppers packed under one roof, but it isn’t all knives.


scissors, art scissors
Grace Horn's Scissors
Grace Horn showed off her custom scissors.  And they flew off the table like umbrellas during a deluge.  I especially liked the tall elegant pair that had a benign demonic look to them.  Grace is an unusual knife maker.  You can follow her on Facebook.  She did measure my right thumb to get an idea of an average size opening for men’s scissors.


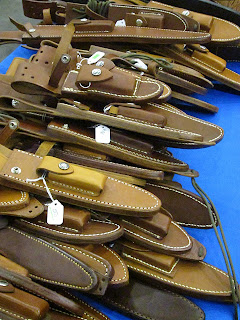
Another table had nothing but knife sheaths.  If you heeded a Randall or a Loveless or just about any other sheath, you’d find it there.
knife sheaths
You need it?  You could find it.

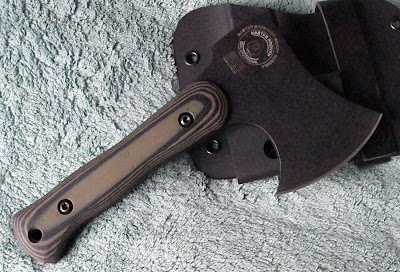
I stopped at Darrel Ralph and looked at his ZEK hatchets.  Darrel tells me he had been thinking about hatchets since 1998.  I think he finally came up with a winner.  The kydex sheath locks the hatchet head in place and has a belt clip so you can wear it.  A secondary strap locks the sheath closed so you will not accidentally lose your tool moving in or out of a vehicle or in the brush.  He had several styles including a nice carbon fiber handle, but I went with the micarta grip that had a rounded profile.  I found it fit my hand better.

Hatchet, Belt Axe
Never know when you might need to chop something or somebody

Speaking of Shadow Tech, they have introduced several lines of folders.  I especially liked their Sidekick, a gentleman’s knife.  Well, it could be a gentlewoman’s knife as well.  It sports a stud and a hole, but it actually opens with a flipper.  The blade opens and is locked in place with a liner lock.  It doesn’t have a clip, because it is not a tactical knife.  It’s well made and I think I’m going to enjoy it.

Sidekick, Shadow Tech
They call it rose, but it looks purple to me 

Sharpening blades can be terrifying to some, but there are easy options 
At one table a vendor had a pile of paper shavings, several knives and more simple sharpeners than you could imagine.  In this day and age when sharpening systems require a mechanical engineering degree to set up and use, his simple pull-throughs turn a dull knife into a sharp edge.  It may not be the zenith of sharpness, but if your edge can cut curly paper shavings, it’s sharp enough for most of my needs.
Doug and friend drawing door prize tickets
Doug Marcaida, best known for Forged in Fire and his expression, ‘It will keel!’ was at Russian Blades and has designed a fighting knife based on his Filipino system.  You could mug with him and get your picture taken, but I took a pass on that.  He’s a tremendous martial artist, but also a shrewd business man.  He showed us several karambit-style knives he designed as rescue tools for Europe, where such knives are illegal.  In the absence of an edge, a ‘blade’ consisting of a seatbelt cutter, screw driver, oxygen bottle wrench is allowed.  Of course, you could still use it to control and apply to pressure points, but Doug never said that.

I got my hands on a DART (Direct Action Response Knife).  Doug developed this knife with the Italian knife company, Fox.  It’s a karambit style, with an Emerson wave opener, but a non-curved blade.  I looked for these for several years but couldn’t find them.  All Fox would say was a “…family disagreement prevented continued manufacturing.”  Well, it seems they are back and I have one!
Direst Action Response Knives
It looks like a Karambit, but.....
Instead of a curved blade, it's more of a drop point tanto

Could I summarize the Blade Show in blog or two?

Look, you could spend the day just visiting the big commercial knife companies, like Spyderco, Cold Steel and Buck, and you wouldn’t be disappointed.  You could also spend the day talking to custom designers, the makers and technical support people.  There are demos on the floor as well as classes, lectures and helpful people everywhere.

The Blade Show has become too large to be summarized by any one blogger.  Each of us is a blind man inspecting an elephant.  If you are a knife fancier, come and attend.  It’s the greatest knife show on earth, possibly the solar system.

Here are few more photos.

collectable knives, pocket jewelry
Think of them as pocket jewelry 

Tiger handles
It takes two to truly understand the image


Wednesday, November 21, 2018

Figuring The Angles!


If you use a knife there comes a time, regardless of the steel, that the edge needs touching up.  Many of us return our knives the company for resharpening or take them to a professional sharpener.

Even thinking of this brings to mind a childhood memory of an itinerant knife sharpener on the south side of Chicago.

He had a push cart that he walked behind and sang out “knife … scissor sharpening” as he traveled down the street.  It had little bells that tinkled and jingled as the cart rolled.  He would sit at the stone which was powered by a foot treadle and sharpen.  I remember my mother with a pair of scissors that needed sharpening as well as all the women in the neighborhood coming out to see this old man and his grind stone.


Not the same one, but similar


I always wondered where he came from and how he got into the business. 

Companies make all kind of sharpening aids.  I had a guide that clipped on the blade of a Buck knife and held it at constant angle.  I didn’t say correct, just constant.  Both sides are worn down from years of use.  I have a Lansky that also clips on the blade and lets you select one of several predetermined angles.  The Spyderco Sharpmaker currently has two predetermined angles, one for back beveling the blade (30 degrees) as you sharpen into thicker and thicker steel and their standard (40 degrees) for sharpening.  Of course you can use either angle for your sharpening your knife.

Some of us can hold a constant angle on a flat stone and simply select an angle based on their experience.  I’m not one of those, but I can free-hand a dull edge into something significantly less dull.

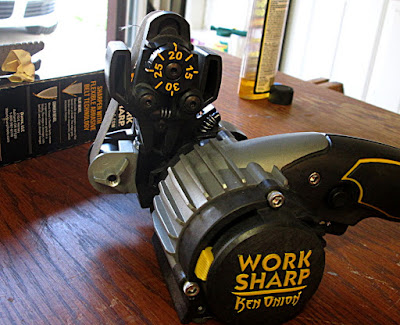
The Work Sharp sharpener comes with several different grit belts but the really attractive part is the dial-an-angle feature.  Simply turn a knob to a predetermined value and you have your angle.  It’s up to you to hold the knife against the supports to get that angle, but it’s not that hard.

powered sharpening
The numbers are the angle and you can swap different grit belts.  The system produces what people call an appleseed or hamaguri grind
Sharpening connoisseurs claim you should find a specific angle for the steel and hardness of your blade and your applications.  I remember a fellow collector, who had the resources of a world class lab at his bidding who addressed this question.  He purchased throwing knives from a single vendor to get the same steel and hardness, and sharpened them with many different angles and types of abrasive grits to determine the “best” angle and method.  Then he had to establish a reproducible cutting test that measured the friction through leather.  Scanning electron photomicrographs were taken of edges before and after testing.

 
I suspect he determined the best way to sharpen that particular knife and not the one in your or my pocket.

Still it’s the angle you need to know.  Audacious Concept, located in Lappeenranta, Finland has the solution for you.  It’s a little dog tag that has precision cut angles from 5 to 45 degrees by fives.  Simply slip your edge into each slit until you find the best fit.  Best fit seems to be when the edge wiggles the least in an angle.

And you get a beer bottle opener!
You can estimate values in between if two adjacent angles both seem to have the same wiggle.

This lets you set your sharpening system to the factory angle or what you have discovered for your knife and use. 

Sure, you could just select any angle, or you could engrave the factory angle somewhere on each blade.  You could keep a notebook with the name and description of each knife with the factory angle and your sharpening angle.  You could do a lot of things.

Or you could just buy one of these little dog tags and keep it with your sharpening supplies.


Monday, April 24, 2017

Spring Sharpening

With the arrival of warm weather my grass has redoubled its effort to make my yard an uneven carpet of green.  Before getting the lawn mower out I needed to resharpen the blade.

I’ve stopped taking it to a lawn or garden center and getting the blade resharpened.  I bought a little attachment for my Dremel tool.  The attachment screws on to the front of the tool and come with a special diameter grinding stone.  A guide helps me hold the blade angle and lets me grind out the really dull and damaged
areas. 


sharpening the edge
Start your sharpening!


 On my electric lawn mower the blade rotates at 3600 times a minute.  A rounded edge will cut the grass by tearing it, but cleanly cut blades make for a better lawn.  Better looking grass without significantly increasing my work load is my goal, so sharpening the blade makes sense.

I clamp the blade down on a sheet of plywood and run the Dremel grinding stone over the old edge several times until the old discoloration is gone and so are the majority of nicks and gouges in the edge.  I use the plastic guide to hold the angle, but perfection isn’t required.  A fine dry stone pulls the wire edge off the other side.  I should mention my mower blade is a classic chisel grind.  I test the sharpness by shaving the edge of the plywood board I use as a work station.

sharpened grass cutter blade


The last step before reinstalling the blade is to check the balance.   If one side of the blade was significantly heavier, the mower would vibrate and damage itself, perhaps even break a blade.  The heavy side just gets another pass and a second balance check.  Repeat as required.


Since I was in sharpening mode I got out my Ken Onion Work Sharp blade grinder and sharpened my hatchet. 

As you know I recently discovered my SOG camp hatchet was extremely dull but luckily my friend Derrick brought his Gerber hatchet.  Having a fire in the fireplace as part of the evening’s entertainment and as a back-up to winter storm power failures is a nice luxury.  The price you pay for this is splitting wood into suitable burning size.  A sharp hatchet is required and mine needed a good sharpening. 

Every fire deserves a sharp hatchet

 I selected the course belt and an angle of 25 degrees as a starting place and ran a black marker pen over the edge.  The marker helps me see what I’m doing and where I’m taking metal off.   A couple of passes and I had removed the entire marker pen.  I flipped it over and did that side. 

dull SOG camp hatchet
Before sharpening, note nicks in blade


The blade looked good so I changed to a medium grit.  That took a little more off and I was satisfied.  But how you really tell if your axe is sharp?

I decided performance was the only way.  I grabbed a section of a landscaping tie and a length of pine 2X4 and tried it out.  I was less than impressed.

The hatchet didn’t cut the wood fibers, but crushed them.  Definitely not sharp.  I changed the angle to 10 degrees and repeated the process.  This angle worked better. 


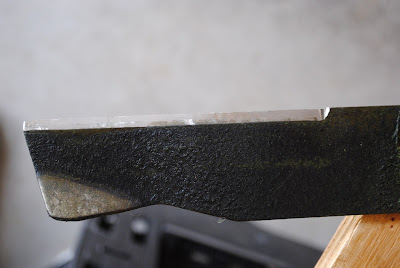
bye-bye nicks!


While I was touching up the edge I noticed the cutting edge wasn’t centered in the blade’s secondary bevel.  This typically happens when one side of a blade is sharpened more than the other.  I played with it for a while and discovered one side the bevel is flat ground while the other is slightly convex.  This bevel asymmetry is the cause for the non-centered edge.


I worked on the edge a bit more and called it finished.  It’s not perfect, but it’s sharper than it was.  Chopping pine boards may not be the best material to judge hatchet performance.  I’ll look around for actual logs to try it out.

Monday, January 23, 2017

Book Review - Primer on Folding Knives

I don’t do too many book reviews, but I’m going to do one now. 
Let me recommend “A Primer on Folding Knives” by Steven Roman.  I think you’ll enjoy this book.  I know I did.


Who is Steven Roman?

He’s a mathematician, currently Emeritus Professor of Mathematics at California State University, but don’t let that scare you.  He’s also a wood worker, pen turner, knife collector and a knife sharpener.  He also likes to write.

The book covers many knife-related topics, like knife companies, opening and locking mechanisms, blade finishes as well as handle materials.  That’s a partial list of chapter one.  Chapter two deals with the complex subject of metallurgy.  As best as I can tell, he’s on pretty solid ground for basic metallurgy.  If you want to find out what elements stabilize austenite or the difference between cementite and aged bainite, you’re going to need a more advanced guide.

Chapter 3 is an intensive look at sharpening. 

Face it, knife sharpeners and knife fanciers come in two varieties: those interested in a working edge and those who want the ultimate edge.  We all fall somewhere on that spectrum.  For my barbecue knife I want the ultimate edge.  It’s never going to be used, just shown off.  But the blades I carry, well, they need to be a compromise between sharpness and durability.  Sharp enough I can cut, but not so sharp the first cut dulls the edge.

Steven suggests trying different edges for different steels and working them to see which edge stays sharp the longest.  By matching edge geometry and sharpening against steels you can obtain the optimal best edge for your use.

Most of us will not do that.  It requires a lot of work, standard cutting tests and plenty of notes about observation on your part.  Most of us don’t take the time or make the effort.  That’s okay.  All we want is a sharp knife.  But if you want the best working edge for a particular knife, you need to put forth the effort.

Oh, just because it’s about folding knives, it doesn’t mean its sharpening ideas don’t apply to fixed blades!


Find a copy of Steven’s book, “A Primer on Folding Knives” and read it.  I think you’ll enjoy it.

Monday, July 4, 2016

Re-sharpening

masking tape tricks
You can barely see the serrated steel edge, the rest is protected by the masking tape
I don’t normally cover the side of a knife with tape to protect it from touching the sharpening stone.

This is a little different case.  It belonged to my mother-in-law who no longer needs it and my wife isn’t sure where it’s going.  She has one and is quite happy with it.  Most of the relatives have one.  Yeah, we gave them as Christmas presents.  She may want to sell it as a used knife. 

I don’t have any problem selling used knives, especially one I know its history of use and abuse.  This bread knife needed a little touch up, and I wanted to ensure a nice appearance. 

Most serrated knives are a chisel grind.  The serrations are cut into one side only.  Sometimes you’ll find only a tiny bevel to remove the wire edge.  When you sharpen a serrated knife you end up with a wire edge along the straight side.

This is easily removed by drawing the knife flat over a fine stone, if you don’t mind the surface scratches.  Enter stage right, masking tape on the blade right above the top of the curve forming the serration.

Since I use a Spyderco Sharpmaker, removing the wire edge calls for me just lifting the blade from flat on the edge of the fine stone a degree or two and back stropping.

I got a nice resharpened edge and protected the finish.  I recommend this to anyone who needs to resharpen a dressier knife.

More 2016 Blade Show news:
By now most of everyone should know Spyderco is one of my favorite knives.  They were the first ones I carried.  The one my wife first carried.  I published my first article about a Spyderco.  Not only that, but I think for the money they are great knives.

I understand Spyderco is coming out with an all new line of kitchen knives.  New steel and new handles, it sounds pretty radical.  My friend at Spyderco tells me she is thinning out her kitchen drawers to make room for the new knives.

Also spied in their prototype display were two throwing knives.  I’ve never seen throwing knives at Spyderco.  I suspect, if throwers come to be, we will not see them until January at the 2017 SHOT Show.  2016 is half over and they and everyone else is still delivering and promoting the new 2016 product.  Most of the magazines already have articles lined up for the rest of the year.  To introduce something so radically new might be missed completely by busy editors and layout demands.

Sunday, January 27, 2013

Chisel Sharp


I discovered I needed my chisel for a woodworking project.  I’m taking a course in hand-cut dovetails.  I need a special saw, which I have courtesy of my grandfather.  The chisel I have courtesy of myself.


I bought it maybe 30-35 years ago.  It’s a Stanley 5/8 inch wood chisel made in the US.  The steel?  Beats me.  I bought it at a time when Stanley stood for quality and that was enough for me.


I took it once to a community theater when I did technical theatre.  We were building a set with lots of doors, so that mean lots of passage sets (aka doorknobs and locks).  I looked up and found a co-volunteer using my chisel to hammer small nails out of wood.  


I’d like to say that he was able to use his hands after a few years to therapy but I’d never hurt anyone that bad over tools.  Fortunately I put a halt to his activity before too much damage had occurred.  I just took it home and kept the damaged edge as a reminder never to lend any tool I cared about. 


Now it was time to rehabilitate that tool.  So I got out my stones.


Just in case you don’t know, most wood chisels are sharpened on only one side.  Hence the term, chisel-grind.  The flat edge lets you cut straight through the wood, while the beveled edge clears the wood away from the cut.  If you sharpened both sides, yes it would be sharper, but it would drift away from the cut line.


I have a nice Norton combination coarse/fine stone I bought years ago.  It’s 11.5 inches long and 2.5 inches wide and I really like that size.  It’s hard to get the right angle for each stroke, but once you get it, 11 inches gives you a lot of sharpening distance.


I oiled it up and started on the coarse side, but it wasn’t taking the metal off as fast as I wanted.  So I switched to my little DMT combo diamond stone.  These stones use water as a lubricant so it’s easy to clean up and store.  I bought the DMT so I could touch up an axe or knife blade in the field.  The coarse diamond worked great, but the relatively small size made the job tedious.  I also thought the ratio of diamond material to open polymer made the effective sharpening area significantly small and reduced the metal removal efficiency.

My selection of sharpening stones
On the left the Norton combination stone; the red is the fine grit. The EZE Lap, and the right is my diamond DMT Combo.
I pulled out my EZE Lap, a six inch long fine diamond stone.  That really took the edge down.  Before long I had worked out all the edge damage and had a nice wire edge. 

Now it was back to the Norton stone.  I continued on the coarse side, which made finer marks than the fine diamond EZE Lap.  I guess it makes sense.  The coarse stone is less abrasive than the fine diamond.


I first flat polished the wire edge away on the back of the chisel and did a second uniform one across the chisel’s edge and moved to the other side of the Norton stone, the fine side.  ("Come to the fine side Luke!  I am your father…") Again I removed the wire edge and repeated the sharpening until I had a third wire edge.  I carefully polished the back of the chisel and was finished.

Almost a perfect job, the right edge isn't perfect, but it's very good
It's a pretty good edge, but the right tip isn't perfect.  I suspect its part of the way I put pressure on the chisel during sharpening.

Did I get it sharp?  I think so.  I shaved a few curls from a block of yew wood I had in the basement and was very happy with its action.


Sharpened chisel shaves yew wood
I shaved a few small shavings with my chisel.  I wanted to see how thin I could make them and how much effort it took.

Could I get it sharper?  Maybe.  Depends on the steel.  I could have gone to an ultra fine polish and left the face mirror shiny.  But would the edge hold up?  Steel for chisels is selected for impact and bending properties not necessarily hardness or even edge retention . Some woods are so hard the best you can do is to slowly remove a 32nd inch thick shaving at a time.  Most woodworkers would rather have to resharpen more often than break a chisel.


I’m happy with the way this sharpening project turned out.  I got a uniform edge at about 25 degrees, with a straight, sharp cutting edge.  

In the spirit of complete honesty I used a little wheeled gismo that holds the chisel at a constant angle.  I don’t have any idea where I bought it, but for sharpening a chisel or wood plane blade, it’s the bomb!!!