Saturday, October 19, 2019

Custom


Making a knife doesn’t mean you have to start with a lawn mower blade and a forge.  A variety of steels in terms of grade and types are available.  Also available are knife kits which in which the blade is  pre-shaped and sharpened.  These kits also come in a variety of completion.  Some have all the components and you assemble your knife. Other require a little more effort on your part.

Woodcraft offers a variety of learning projects so I signed up for the knife making.  I wanted to see how they handled epoxying and pinning handles.  As you’ve seen on Forged In Fire, pinning handles onto your knife is one of the major stumbling blocks for contestants.  They need to drill through steel, align holes, hammer pin in place while the five minute epoxy is hardening. 

knife making
Basic kit plus wood handles

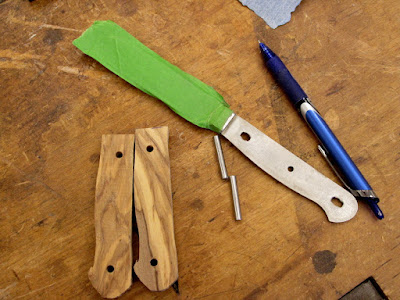
Here’s my kit and I’m using a light olive wood for the handle.  The first step is to turn a 3/8 inch thick slab into two slabs.  The second is to tape your blade with removable painters tape.  Use lots of tape to protect your hands from the edge.  Safety first.

kit making
Turning one piece of wood into two

We traced the handle on the wood blanks making sure a square end of the wood are in  complete contact with the bolster, then on to the band saw.  Removing excess wood is a time saver, but leave enough just in case your handle needs to be finessed a little.  But really, a hand coping saw would have worked just as well.  You could just sand it all away too.
knife kits
Taped, trimmed, ready for epoxy

After you assure yourself each side of the knife’s handle has the correct cutout, the pins fit correctly and you’re happy with everything, dry fit it together again.  Can’t be too careful!
making a knife
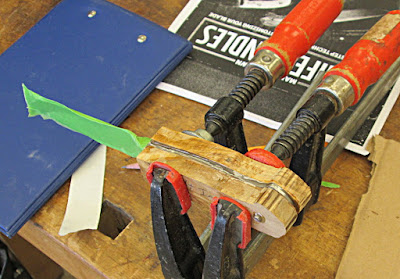
Clamped

Now get the clamps out and mix your epoxy.  So, Bunkie, five or thirty minute epoxy?  The class used five minute because it is fast and we gave it a half hour.  I like the thirty minute or longer.  I want the longer time for fixing an “Oops!” and I believe longer cure epoxy is stronger.  While I have no plan to destroy an elk’s skull or batter the hood of a 1948 Ford pick-up truck with my knife, stronger always seems better to me.

After the epoxy is cured, it is sanding time.  Woodcraft has a variety of terrific sanders, rotary oscillators with different radius, belt sanders, disk sanders but all you really need is any sander you have and patience.  

kits
Sanding in process.
Your plan of attack is different from anyone else.  I like a rounded handle with a palm swell and flat top.  Start removing wood, but remember the Golden Rule of carpentry:  It’s easy to take wood off, very hard to put wood back.

Keep handling your knife.  How does it feel to you?  Too thick?  Too rough?  Edges sticking up?  Keep working.  And while you’re striving to make your knife, remember perfection is the enemy of accomplishment.  Experiment with it.  Do you want an asymmetric “D” shape handle or maybe oval facets?

adventure with knives
Finished


When you get it to the shape you want, move to a finer grit paper.  Work your way down to a finish you want.  How about polishing to a 4000 grit finish?  The wood starts to come alive the more sanding dust you create.

The wood finally explodes to life with a finish.  You can stain it, wax it, linseed oil it, urethane it.  That’s up to you.  I used a coating of flax seed oil.  Just a fancy name for linseed.  That a drying oil, so I left it outside in the sun to help cross link the finish.

kit knife
Just one variety of the steel and blade shapes available

It’s not perfect, but the next one I make will be better.  I know what to look for and what to watch for.  And I know how much fun it was.

Tuesday, October 8, 2019

Flying with Cygnus


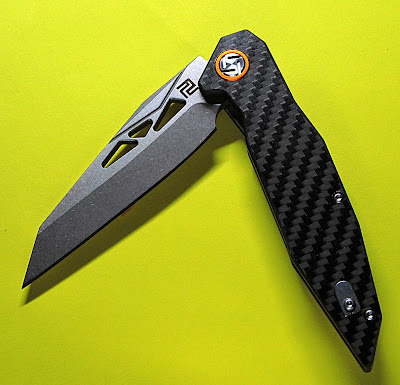
The Cygnus from Artisan Cutlery is amazing.  The carbon fiber handle is backed with a steel insert on each side for stability and to anchor the liner lock.   The blade is stone washed D2 steel and is fashioned as a reverse tanto saber grind.  There is a tiny false edge to move the blade’s center of gravity farther out from the pivot point.  This is assisted by three triangular openings in the top of the blade. There is mechanical advantage gained by having the acting center of mass extended from the fulcrum or pivot point. 

Cygnus knife


Enough of the physics, just know that when propelled by the flipper the blade flies open on ceramic ball bearings.  When the knife is locked open the flipper becomes part of the guard to keep your fingers off the sharpened blade.  I’m always appreciative of that!

Artisan Cutlery describes the blade as a drop point, but in my experience, drop points are curved and gradual.  This area is a downward slash and gives the blade its strikingly good looks.  The diamond cut outs add to its appearance.  It looks as if the open knife is already in motion even when it is standing still.

Back side closed


D2 is an excellent choice for a blade steel.  Not quite stainless, it requires a drop of oil now and again, but D2 tool steel is a versatile air-hardening steel with good resistance to wear from sliding contact with other metals and abrasive materials. With a HRc of 58-60 the blade will give you good edge performance and can be sharpened with ordinary stones.  

Here are a few more specifications for you:  The blade is 3.5 inches long, 0.15 inches thick and the open length of the knife is 8.5 inches.  The clip is reversible for left and right carry and a lanyard pocket is built into the spine.  The total weight is 4.23 ounces.  The Cygnus is worn tip up in your pocket, my favorite carry position.
 
I’m impressed both by the ease of opening as well as the stylish good looks.  You’ll get quite a few compliments with this knife.  Rub your fingers over the surface, look and touch for rough spots and mis-alignments.  I didn’t find any.  Feel the lock up and hear the snick when the blade closes.  The flipper is constructed to prevent the sharpened edge from dulling against the closed back of the knife.  There is a lot to like about this knife.


After you buy one, spend a few moments preparing for all the compliments you’re going to get.  Tell ‘em they can get their own at:
Artisan Cygnus is $69.99,  Don’t be left out.

Wednesday, September 25, 2019

Mack's Knife


Sherman, set the Wayback Machine to the mid-60s.

Buck Knife has knocked America and the world on its collective ass with the Buck 110 Hunter.  It’s not the first lock-back knife, but the combination of a solid lock, 420HC stainless with great heat treatment and a belt carry pouch occurs at the right point in time.  Everyone carries one.  My favorite literature hero, Matt Helm carries one; I sold a very nice German locking knife to my brother so I could buy one.

Cops, firemen, soldiers, outdoors men, scout masters all wanted to carry a Buck 110 Hunter.

Open Shark Tooth
Case's Shark Tooth

This doesn’t pass unnoticed by Case Knife.  Coming out of WWII Case remains a conservative company making knives the old fashioned way by hand with carbon steel blades.  Case wants in on this market share.  They just don’t want to compete; they want to send Buck home hungry.  By 1972 they have their world beater.  They call it the Shark Tooth.

The Shark Tooth is a spine locking blade with a palm swell to fit your hand better than the slab-sided Buck.  The 3-inch blade is backed with a finger divot so you can choke-up for fine work and still get the long blade reach.  The blade is stainless steel that holds an edge, but its identity isn’t revealed.  I don’t know why.  Both bolsters are brass, but the back one is cut on an angle to give it a streamline appearance.  This knife also comes with a leather pouch cause weighs almost a half-pound!  Too heavy or bulky to flop in a pocket.

The wood insert with the palm swell will be made from curly maple, but problems stops production.  The 1974 catalog (printed in 1973, I assume) has a picture of the Shark Tooth, but it’s stamped “Unavailable.”

Closed Shark Tooth
The back edge beveled for a more streamline appearance

Finally Case decides on replacing the maple with Pakkwood and on December of 1975 finally ships the knives to distributors just in time for Christmas.  That made Santa very happy.

The Shark Tooth stays in production until March 2009. 
It’s a milestone knife for Case.  It marks the first use of a blade made from a modern stainless steel with good tempered used in a Case lock back.  Several other types of Case knives are released with that steel, but those are stories for another time.

Despite the trouble Case had with the curly maple handle insert, it manages to make 1800 of these.  These are hidden in a vault guarded by the Case gnomes.  What a treasure that would be to Case collectors.  It would be a unique collector’s knife, wouldn’t it?  If only we could get past the gnomes.

Too late.  In 1977 Case released all 1800 curly maple handled Shark Tooth (Teeth?) to their distributors.   Fox Mulder is right!  They are out there!

Friday, September 6, 2019

Serious weight: CRKT Seismic


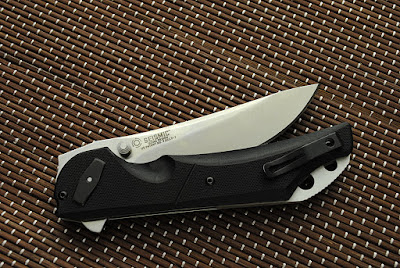
Just got my hands on CRKT’s new Seismic with the ‘Deadbolt Lock’ developed by Flavio Ikoma.  It’s a beast!  It weighs in at 6.3 ounces with a 5.5 inch handle holding a 4 inch blade.  I like knives with slightly over sized handles.  You need a big handle to hold and use a big blade. 

strongest lock, knife
CRKT's Seismic

 
Flavio Ikoma has become one of Brazil’s top knife designers.  Growing up he was fascinated with the varieties of Japanese swords.  Encouraged by his father and having access to the tools and materials in his father’s shop, he made edges.  This interest spurred him to learn metallurgy, work with other knife makers and become a knife innovator.

The Seismic sports his IKBS ball bearing system as well as what has been described at the strongest lock on the market, the Deadbolt.  There are always a lot of claims of the strongest lock and they seem to depend on the test methodology.  Still, the Seismic locks up with one hell of click.

Knife, Deadbolt, Strongest knife lock
The bowtie at the pivot point is part of the deadbolt lock

To release the lock you press the knurled ring around the pivot.  This pushes a large bowtie shaped bar of metal out the back of the knife and unlocks the blade.  Impressive!

Here are some more stats:
The 0.6 inches thick handle is G10 overlaid on a sketalized metal frame that.  The G-10 has a grippy feel to it, almost enough to give you the fingernails-on-chalk-boards feeling.  (Assuming you know about chalk boards.)

The blade steel is a ground slab of 1.4116 stainless steel 0.15 inches thick.  This steel is reportedly used in Swiss Army knives.  The blade is a drop point with a high shoulder, flat grind.  A shallow false edge decorates the blade.  The sweeping edge reminds me ever so slightly of a skinner.

This steel is reported to have a RHc of 55-57.  While many consider that too low to retain an edge, let me remind you of three things:
  • That hardness resharpens quickly with simple stones;
  • Steels in this hardness range tend to bend instead of snap when misused; 
  • Ernie Emerson once said a knife with a bent blade is still a knife, a knife with a broken blade is junk.

What’s in 1.4116 steel?  The composition is relatively simple, 0.45% carbon, 14.7% chromium, a sprinkle of vanadium at 0.17% and a smattering of elements common to modern steel manufacturing.  Reports from the field suggest 1.4116 steel shows good corrosion resistance.  That’s important to me as I’m a bit careless with my tools.

You can find your Seismic at https://www.crkt.com/seismic.html.  Mention this blog for blank stares and verbal “Huhs?”  The suggested retail is $150.00