So I cut the foam in half.
Because of my design I wasn’t able to get the entire strip of Kydex in the toaster oven. This was complicated by the rack in the toaster oven. I knew from previous attempts if I left it in there too long I’d get parallel stripes on the Kydex. Those lines look good on a strip steak, but not on a knife sheath.
I started with two sheets of tactical black Kydex. Tactical means they can charge more than if it was pink. Both sheets were 0.095 inches thick. One piece was about six inches longer than the other so I could turn it into a belt loop. I used two little brass decorative rivets to hold the pieces in registry and placed the sheets in the oven.
As soon as the plastic was floppy, I pulled the hot pieces out, slipped the knife in and slapped everything into the press. Two squeeze clamps held everything together while I placed C-clamps on either side of the knife handle.
Now the hard part………Waiting.
Let me get in a plug for Ansell HyFlex gloves. They are yellow Kevlar gloves with a thin black rubber coating on the palms and finger tips. They take all the hesitation out of grabbing hot Kydex. (http://www.ansellpro.com/hyflex/11-500.asp).
By now the sheath has cooled. Still didn’t get that high definition impression of the knife in the plastic I wanted. Maybe it wasn’t warm enough, maybe it is too thick, maybe the low density foam is too soft. Next iteration, I’ll make changes.
I used a number two pencil (brings back memories of test taking in school – make sure you completely fill in the box with your number 2 pencil….) and drew the outline I wanted. I marked where the decorative faux rivets would go and set up my drill press. I soon had the rivets where I thought I wanted them. Next step: cutting it out.
In my excitement of actually making a sheath, I kinda forgot that I don’t have a band saw. My original plan was to use one at work during my lunch hour. That also was forgotten. I grabbed a coping saw and started cutting. Time for sanding.
I bought a set of little sanding drums for my drill press and before I knew it I was rounding the edges and shaping the sheath into not what I wanted, but by my placement of those damn rivets.
I used a piece of wood with rounded edges to act as a belt template and heat gunned the excess Kydex in to a belt loop. Two 7/32-inch holes for my Chicago screws and the sheath was finished.
I didn’t like it. The brass rivets looked hokie and I was concerned about their holding ability.
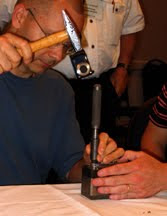
Online I found pricey black aluminum pop rivets, but I wanted to keep the cost down on this experimental project. I replaced all the brass rivets with aluminum pop rivets with backing washers. (They popped right out with a pair of side cutters so maybe my concerns about them were valid!) I peened the back of the rivets down with a ball-peen hammer using a bar of polished steel as an anvil. This worked well.
Front side- Yes, there is a knife in all that Kydex.
(back side)
So, there it is. Not quite what I wanted, but it’s a functional sheath, holds my knife securely, and protects me and the blade should I take a tumble with the knife on.
Not quite the form fitting I had in mind
I’m going try thinner Kydex, maybe a combination of thickness: thick to form the back of the sheath, thin to mold the knife. And I’ve got to replace the grill in the oven. I need to plan rivet placement more and I need to find a better way of belt looping it. I’ve seen the new Tec Locs, but I’m not sure about them. I want to keep the overall cost low. It is, after all, just a hobby.
I do like the new Tec-Locs, the locking bar is no longer a seperate piece, but built in
Oh yes, let’s not forget the foam in the press. My wife found what I think is the perfect foam. It even has a cross-hatch pattern.


